

Have you ever been tasked to determine Starting and Ending Balances in your analytical solution with only transaction amounts available to you? Have you spent countless hours trying to arrive at the numbers that make sense at every level of calendar hierarchy and across all the different dimensions of your dataset? Were you frustrated by the process? Then you have come to the right place! I will walk you through the step-by-step process of creating both Starting and Ending Balance measures using Power BI and DAX.
At the time of this blog post writing, there were several articles available on the Internet on how to deal with ending (or closing) balances, but they were mostly focused on how to correctly read and display balances that are already available and not the ones that you have to calculate from your transaction data. Another limitation was that there wasn’t much on the starting (or opening) balances, mostly on ending balances. I will cover both in this blog post.
I have recently worked through a problem for a client that involved calculating starting and ending balances from only existing transaction amounts using Power BI.
Let’s explore this use case.
Background
Balance numbers are very common for such business areas as: Human Resources (headcount), Supply Chain and Warehousing (inventory) and especially in the world of Accounting and Finance (account balances, open/close stock prices, etc.).
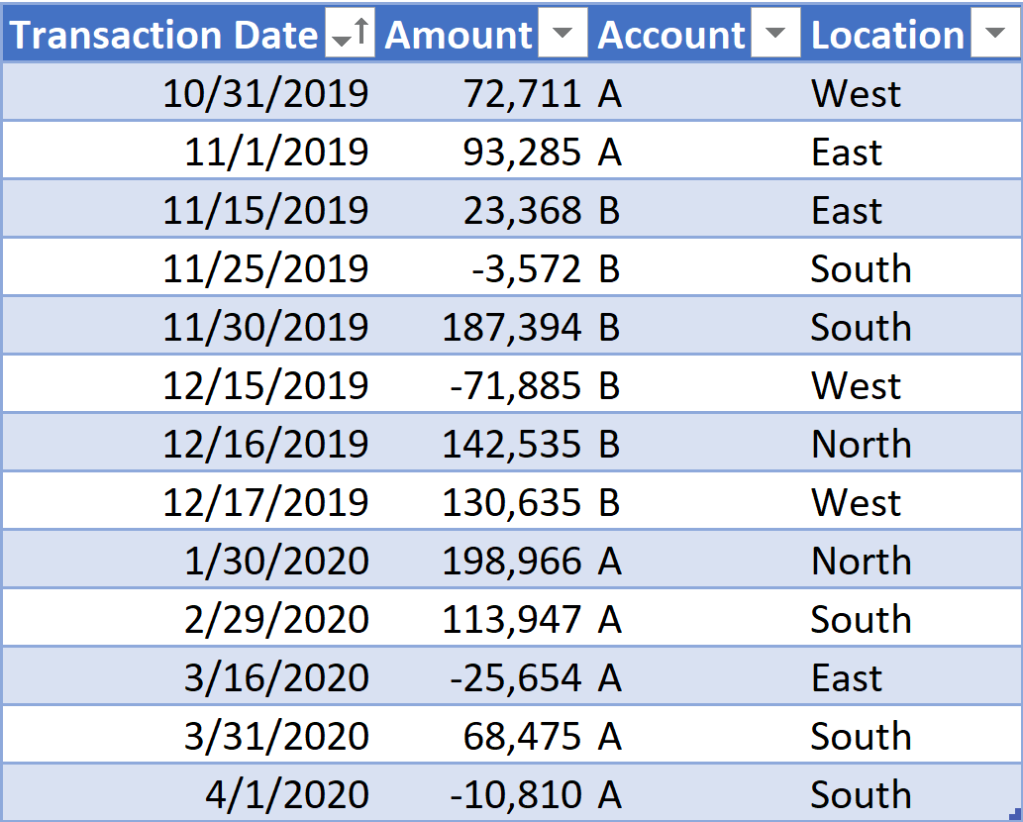
It is quite common for a new business or a project to begin tracking their transaction data by simply entering the details of each transaction into some kind of transactional system (an Excel spreadsheet, a SharePoint list or perhaps into a relational database), so that the data can be later analyzed by whatever dimensions are available at the time of entry or those that can be perhaps derived at a later date. It could be as simple as the picture below…

…or perhaps, a slightly more complicated version with separate columns for additional dimensions that the real world throws at us (Accounts, Locations, etc.). We will use this more complex version as our data source to prove that our solution works.
Defining the problem
We need to determine Starting and Ending Balances for every level of calendar hierarchy and for any other dimension using only incoming and outgoing amounts of transactional data.
Designing the solution
We have to remember that balance measures are semi-additive measures, i.e. they can be added across all dimensions, except time. We will keep that in mind while we are building the logic for our balances.
Typically, the main components of this basic business equation are as follows:
Starting Balance + Incoming Amount – Outgoing Amount = Ending Balance
At this point of our use case, however, the only known parts of the equation are the Incoming and the Outgoing Amounts. In my case they are part of the same column where Outgoing amounts are distinguished by the “-” sign. However, your data source may present them differently:
- listed in completely separate tables;
- listed in two separate columns of the same table;
- listed in one column, but with an additional “designator” column indicating whether the amount is incoming or outgoing;
- some version of the above.
Whatever the case may be, it would be a good idea to normalize your fact table to a third normal form by merging (or appending, depending on the structure of your data) them into one column using Power Query, so that you have one row for every transaction, only one column for the Amount and handle the designation with either the sign or another designator column indicating whether the amount is Incoming or Outgoing. The mechanics of that are beyond the scope of this article. I chose “the fewer columns – the better” path in my example, as it generally saves space and cuts down on query time, all of which improves performance at scale.
In the end, our data model is going to look like this:

Assuming you have done that and your data model is set up correctly with ‘Transactions’ being your data (fact) table and ‘Calendar’ being your lookup (dimension) table along with the other lookup tables you’d like to slice your data by (Location and Account in this case), we can now quickly build measures based on the ‘Transactions'[Amount] to determine your results (assuming Incoming Amounts are positive and Outgoing Amounts are negative).
[Incoming Amount] Measure
Incoming Amount =
CALCULATE (
     SUMX (
          'Transactions',
          'Transactions'[Amount]
     ),
     'Transactions'[Amount] > 0
)
[Outgoing Amount] Measure
Outgoing Amount =
CALCULATE (
     SUMX (
          'Transactions',
          'Transactions'[Amount]
     ),
     'Transactions'[Amount] < 0
)
These two measures are useful on their own, but for the purposes of simplifying the process of building out our two balance measures, we are going to combine these two into a [Net Amount] measure that we will use as a building block for our [Starting Balance] and [Ending Balance] measures.
Expressed in DAX terms, this will be the measure we will write to summarize the results of the same ‘Transactions'[Amount] column.
[Net Amount] Measure
Net Amount =
CALCULATE (
     SUMX (
          'Transactions',
          'Transactions'[Amount]
     )
)
At this point it would be good to throw a quick table or matrix visual up on the report page to validate our total numbers as well as the slicers for our dimensions. It’s generally a good practice to make sure every measure you write produces the result you are expecting. Build quality into your work as you go!

[Starting Balance] Measure
First, let’s write the logic of what we are trying to achieve in plain [insert the language of your choice here] before we start writing DAX. This will serve several purposes:
- Force us to think through the logic in simple terms that we can explain to anyone;
- Continue iterating on the logic in case we later find that we have forgotten some condition or part of the logic as a result of our testing and validation;
- Keep us grounded and provide a frame of reference if we start getting too far down the DAX logic rabbit holes.
It would perhaps sound something like this:
“I need to find the date of my first transaction and assign a 0-value to it as the Starting Balance for that date. For any dates after my first transaction, I need to return cumulative Net Amount that does not include Net Amount from the current context date.”
Starting Balance measure defined in plain English.
Now let’s try breaking it down and translating it into DAX terms.
Since it sounds like there are several components that we have to figure out in order to determine this [Starting Balance] measure, we will have to write some variables. I actually prefer to write these as separate measures first, so I can test the results of these “building blocks” in a matrix or a table visual, as I go along developing more complex measures. Then, either copy the code into a respective variable inside a more complex measure or simply reference these helper measures directly from that complex measure I am trying to build.
Our steps will be as follows:
- Find the date of the first transaction.
- Assign a 0-value to the Starting Balance on the date of the first transaction.
- Calculate Net Amount from the date of the first transaction and carry it forward.
Let’s go through these steps one by one in more details.
Step 1: Find the Date of the First Transaction
To find the date of the very first transaction (so that we can assign a 0-value to our [Starting Balance] measure on that date), we would actually have to create two measures: [First Transaction Date] and [First Record Date], so that we can then compare the two in our [Starting Balance] measure and identify the first ever transaction and assign a 0-value to it. Hold that thought – we will come back to it.
[First Transaction Date] Measure
First Transaction Date =
     FIRSTNONBLANK (
          'Calendar'[Date],
          [Net Amount]
     )
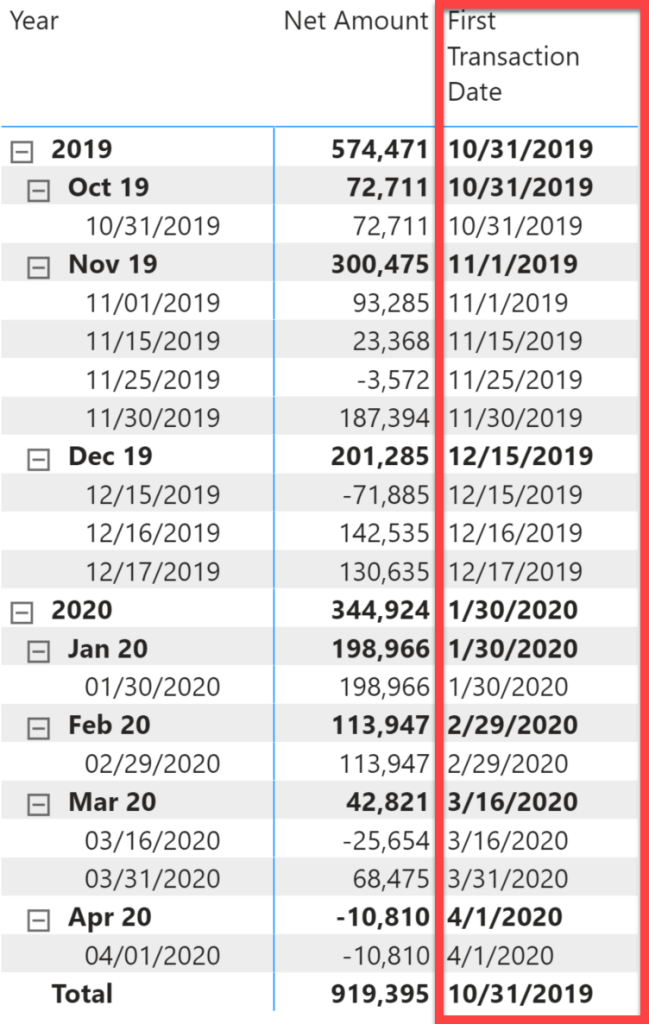
This measure will allow us to return the first (non-blank) date for [Net Amount] measure in the current filter context. So, putting this into a context of the below matrix, it will return the following results, which nicely roll up to a month, year and grand total levels:
Now we need to create First Record Date, which overrides the calendar filter context (but still respecting any other filters applied) and shows us the date of the very first transaction, regardless of what date range was selected, so we can compare it to our First Transaction Date.
[First Record Date] Measure
First Record Date =
    CALCULATE (
        FIRSTDATE ('Transactions'[Transaction Date]),
        ALL ('Calendar')
    )
This measure will return the date of the first transaction for every date that our ‘Calendar’ table holds. Bringing it into our matrix visual, we see the following:

Great! The row that we are expecting to match on the date is the correct row, so now we can proceed with creating our Starting Balance measure and testing it for this first condition.
In our [Starting Balance] measure we will be referencing these two measures in respective variables like so:
VAR _FirstTransactionDate = [First Transaction Date]
VAR _FirstRecordDate = [First Record Date]
Step 2: Assign a 0-value to the Starting Balance on the date of the first transaction
Now we are ready to add the condition that checks for the match between these two variables and enters 0-value for that line and see what the result looks like. Let’s write a test measure and see what it produces as a result:
Starting Balance_test =
    VAR _FirstTransactionDate = [First Transaction Date]
    VAR _FirstRecordDate = [First Record Date]
RETURN
    IF (
        _FirstTransactionDate = _FirstRecordDate,
        0,
        [Net Amount]
    )
Here’s what we see in our matrix visual now:

That’s a great start and we have now accomplished Steps 1 and 2 of our objective!
Step 3: Calculate Net Amount from the date of first transaction and carry it forward.
Fantastic! We got what we wanted on that 10/31/2019 line. However, if we collapse our matrix to the month level and remove the First Record Date measure from the matrix (so we only get the rows with activity), we immediately see a couple of issues with the results right below:

What is happening here? Let’s take a look.
- New month’s data does not take into account prior month’s data (we were expecting Net Amount of 72,711 from 10/31 to show up in our 11/1 results).
- Instead the results are net cumulative for the month, identical to our Net Amount measure that we have created earlier.
Let’s go ahead and address those issues.
What we have to do now is:
- Create a variable with a virtual filtered Calendar table that constrains the calculation of Net Amount for any dates between the First Transaction Date and the Last Transaction Date.
- Insert this variable as a filter clause of the CALCULATE function we are using in our Starting Balance measure.
Since we don’t have [Last Transaction Date] defined yet, let’s make sure we have a measure for it. Reusing the logic from a similar measure ([First Transaction Date]) here it is.
[Last Transaction Date] Measure
Last Transaction Date =
    LASTNONBLANK (
        'Calendar'[Date],
        [Net Amount]
    )
Now we can simply reference it in a variable:
VAR _LastTransactionDate = [Last Transaction Date]
Next, this filtered calendar table variable will look as follows:
    VAR _TempCalendar =
    // creating a temporary calendar table (variable) to constrain the calculation of [Net Amount]:
        FILTER (
            // removing filter context from the entire 'Calendar' table:
            ALL ('Calendar'[Date]),
            // ...and including dates prior to earliest 'Calendar' date in the current filter context:
            'Calendar'[Date] < MIN('Calendar'[Date])
            // ...and dates prior to [Last Transaction Date] of the current filter context:
            &&
            'Calendar'[Date] < _LastTransactionDate
        )
Putting it all together, our updated [Starting Balance] measure should look like this at this point.
Starting Balance =
    VAR _FirstTransactionDate = [First Transaction Date]
    VAR _FirstRecordDate = [First Record Date]
    VAR _LastTransactionDate = [Last Transaction Date]
    VAR _TempCalendar =
    // creating a temporary calendar table (variable) to constrain the calculation of [Net Amount]:
        FILTER (
            // removing filter context from the entire 'Calendar' table:
            ALL ('Calendar'[Date]),
            // and including dates prior to earliest 'Calendar' date in the current filter context:
            'Calendar'[Date] < MIN('Calendar'[Date])
            // ...and dates prior to [Last Transaction Date] of the current filter context:
            &&
            'Calendar'[Date] < _LastTransactionDate
        )
RETURN
    IF (
        _FirstTransactionDate = _FirstRecordDate,
        0,
        CALCULATE (
            [Net Amount],
            _TempCalendar
        )
    )
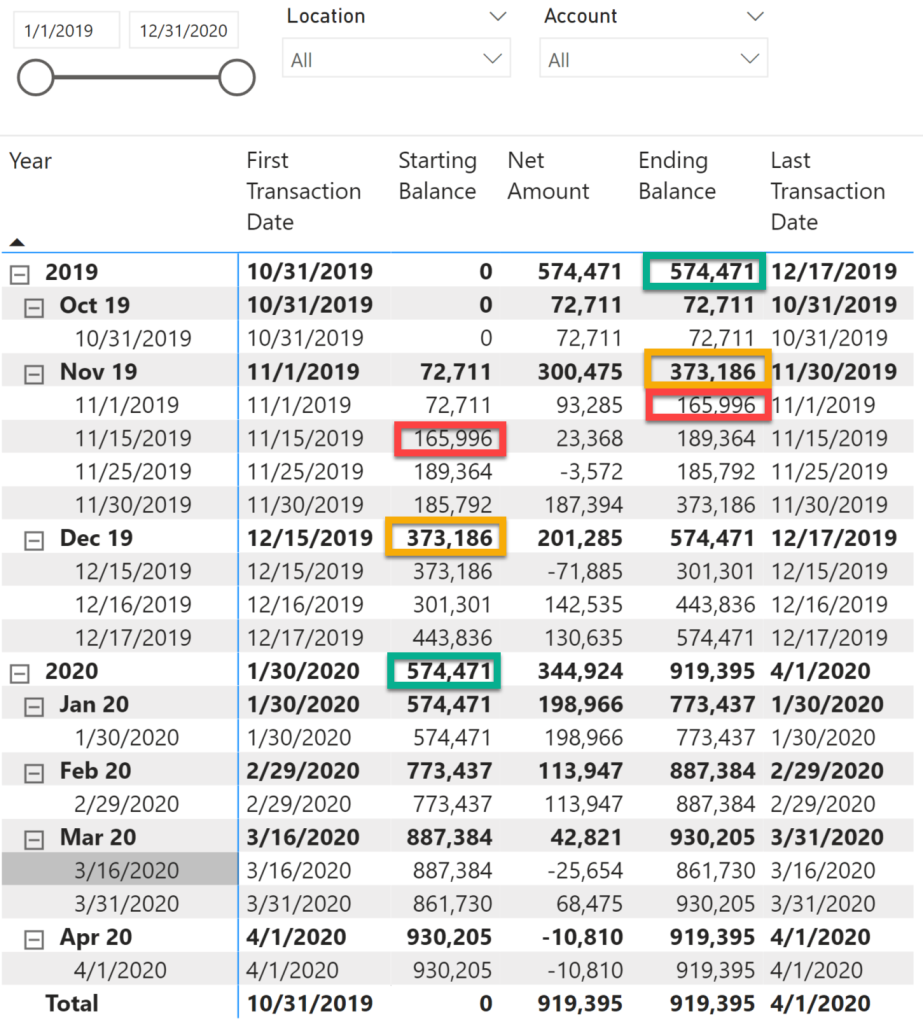
Time for the final test. Let’s add this measure to our table and see if we get the results that we want.

[Ending Balance] Measure
The only thing left to do is to add a (much) simpler [Ending Balance] measure and to check it’s validity.
Here we are altering our _TempCalendar variable slightly on lines 9 and 12 to achieve desired results.
Ending Balance =
    VAR _LastTransactionDate = [Last Transaction Date]
    VAR _TempCalendar =
        // creating a temporary calendar table (variable) to constrain the calculation of [Net Amount]:
        FILTER(
            // removing filter context from the entire 'Calendar' table:
            ALL('Calendar'[Date]),
            // and including the range between dates on or before the latest date in 'Calendar' table in the current filter context:
            'Calendar'[Date] <= MAX('Calendar'[Date])
            // ...and dates on or before the [Last Transaction Date] in the current filter context:
            &&
            'Calendar'[Date] <= _LastTransactionDate
        )
RETURN
    CALCULATE(
        [Net Amount],
        _TempCalendar
    )
As we can see below, all of our numbers for Ending Balances are lining up nicely with our existing Starting Balance calculations on all levels.
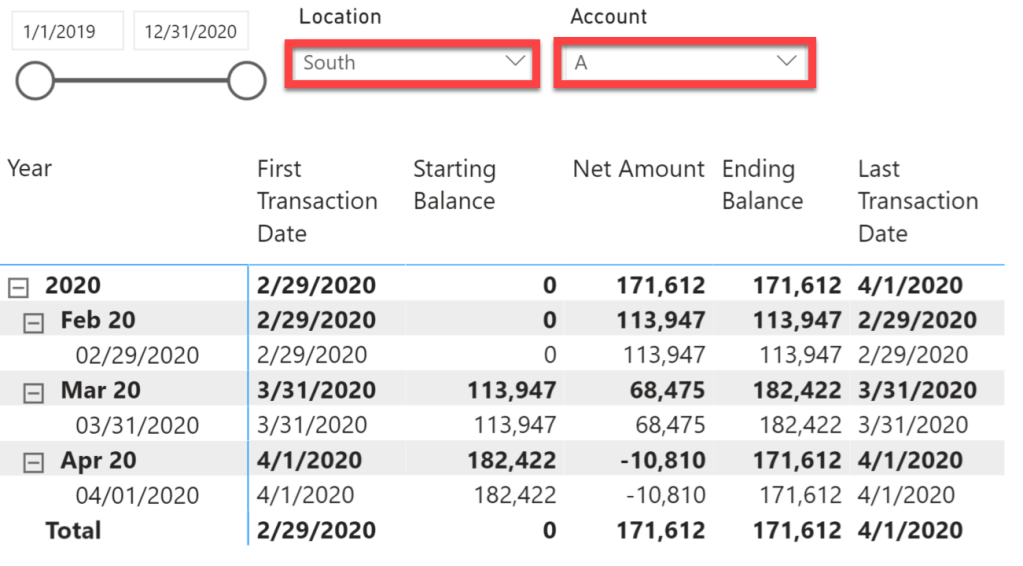
If we test our solution for a particular Location or Account (or both), the results still look good:
P.S.: I will leave you with a parting gift.
Depending on your requirements, you may want both of your balances to carry forward to the date of the last transaction of the entire data set (as far as your filter context and Calendar table allows). In this case I would recommend creating separate [First Record Date] and [Last Record Date]) measures. Since we already have the [First Record Date] measure let’s created the [Last Record Date] measure:
Last Record Date =
    CALCULATE (
        LASTDATE ('Transactions'[Transaction Date]),
        ALL ('Calendar')
    )
Now that we have both [First Record Date] and [Last Record Date] measures, we can create “extended” versions of our Starting and Ending Balance measures that show something for every day in our dataset. That way you can use either one depending on your business requirements.
Here they are:
[Starting Balance (Extended)] Measure
Starting Balance (extended) =
    VAR _FirstTransactionDate = [First Transaction Date]
    VAR _FirstRecordDate = [First Record Date]
    VAR _TempCalendar =
        FILTER (
            ALL ('Calendar'[Date]),
            'Calendar'[Date] < MIN ('Calendar'[Date])
            &&
            MIN ('Calendar'[Date]) <= MAX('Calendar'[Date])
        )
RETURN
    IF (
        _FirstTransactionDate = _FirstRecordDate,
        0,
        CALCULATE (
            [Net Amount],
            _TempCalendar
        )
    )
Notice here we are adding a condition to our _TempCalendar variable that makes sure we are
[Ending Balance (Extended)] Measure
Ending Balance (extended) =
VAR _LastRecordDate = [Last Record Date]
VAR _TempCalendar =
    FILTER(
        ALL('Calendar'[Date]),
        'Calendar'[Date] <= MAX('Calendar'[Date])
        &&
        'Calendar'[Date] <= _LastRecordDate
    )
RETURN
    CALCULATE(
        [Net Amount],
        _TempCalendar
    )
Now if we add all of our measures to the same matrix visual, we get the following picture:

Another data problem – solved!

Congrats on starting your own blog. I started mine a few months ago, too, and it’s a ton of fun.
LikeLiked by 1 person
Thank you so much, Rachael!
LikeLike
Very nicely explained. Great business case with step by step solution. Thanks.
LikeLiked by 1 person
Thank you, Nafi! 🙏🏻 I’m glad you liked it!
LikeLike
Kirill, great explanation to a common problem! Thanks for contributing to the collective! I’ll definitely keep in my ‘cheat sheet’ list. Great job with the blog – keep it up!
LikeLiked by 1 person
Thank you, Quentin!
LikeLike
Congrats Kirill. Very nicely done.
LikeLiked by 1 person
Thanks, Brent!
LikeLike
Very nice Kirill. Great blog!
LikeLiked by 1 person
Thank you very much!
LikeLike
Gracias por compartir sus conocimientos. Saludos desde Colombia
LikeLiked by 1 person
Con placer, señor Parra! Saludos a usted también! Y buena suerte!
LikeLike
As an Excel/PowerPivot do it yourself-er, I sometimes need help on solving a problem where my knowledge of tabular queries and the DAX language is too low. This article helped me solve a perplexing problem on keeping up with my Investment Portfolio balances by transaction date and by fund ticker.
This well written article, not only allowed me to “script kiddie” my solution, but the clear layout and details of how and why helped me learn more about DAX and Powerpivot. Thank you!
LikeLiked by 1 person
Jim, thank you for your comments and kind words! I’m very glad you found the article helpful and that you were able to apply it to address your own problem!
LikeLike
Hi – my knowledge of dax is rather limited and find your above method very useful. Just one question through – how do I get just one Closing Month figure for the Ending Balance i.e ending balance at Jan 31st, Feb 29th etc?
LikeLike
Hi, Waikong!
Sorry for the delayed response. I am not quite sure I understand the question. If your structure your table or matrix visuals appropriately, at the month level you will see just one Ending Balance number, which will be equivalent to the latest balance date within that month.
LikeLike